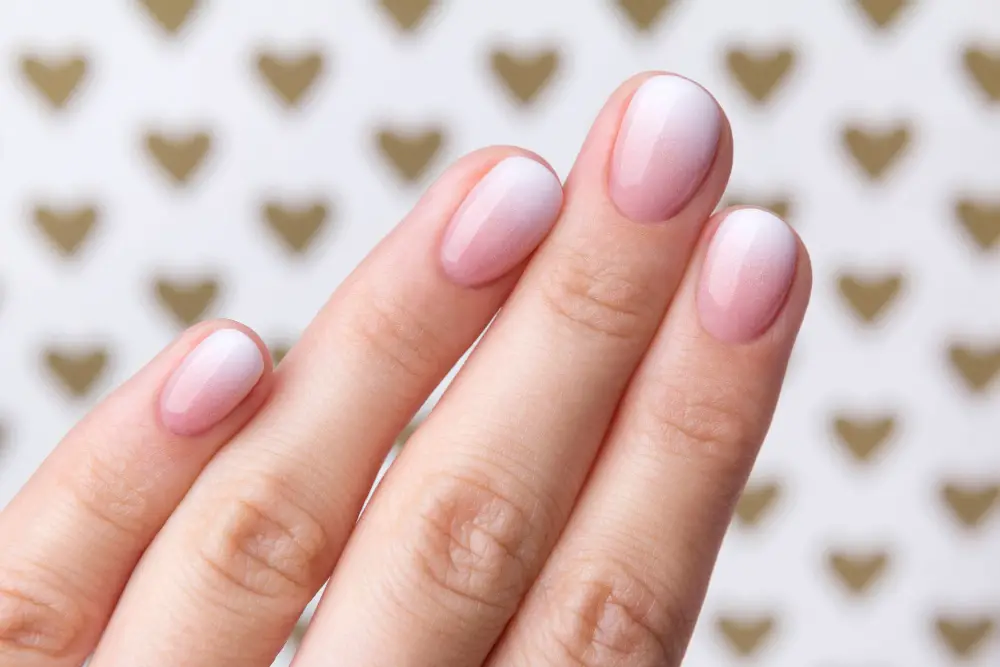
If you are searching for a few ways to get creative with nail art designs this summer, take a look at the ideas we have below. Ombre nails are popular globally because they blend well with various types of attire. More so, nail enthusiasts also find it easy to incorporate such nails with unique designs.
It’s an exceptionally appealing color that involves using nail paints with a unique “fade out” effect. The nail trend is appealing, and is becoming increasingly popular for experimenting with varying gradient designs. Regardless of whether you like elegant nail designs, or something more intricate – ombre nails are excellent!
Below are a few excellent designs we pulled of for you to try:
1. Gray to White
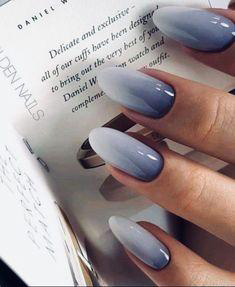
Take a look at this unique striking ombre nail colour, that looks appealing and stunning at the same time. The nail design involves using a set of acrylic nails that have a dark blue color, with the ombre effect.
You will have to start by cleaning your nails, and then setting the ombre acrylics of your nails. We also recommend applying a base gently on the nails, to give it an appealing finish. The good thing with this look is that its dynamic, meaning you can wear it to different situations.
| Application Time | Products Needed | Challenges |
| 1Hour | Ombre nails, clear coat, nail glue and nail disinfectant. | Setting the acrylics on your nails. |
2. Brown to Purple
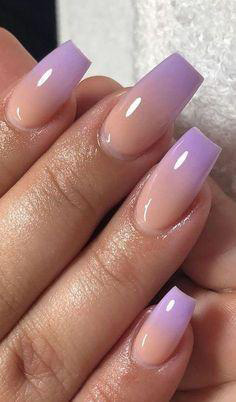
The other topic picks on the list of ombre nails would be this unique brown to purple nail coat design. You will need to first clean your nails, and then set acrylics on them. Remember that, to pull off this look, you have to use long acrylic nails.
These types are ideal in bringing out the richness and appeal of both these colours. Complement this look by applying a clear base coat, and then place your nails under an LED light. For an added appeal, you can also apply a clear base coat on your nails.
| Application Time | Products Needed | Challenges |
| 2 hours | Long tipped acrylics, clear coat, nail disinfectant, and nail glue. | N/A |
3. Black to Maroon
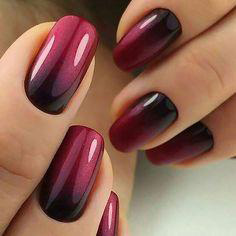
Black and red paired together can be intense colours. So, this is why this Black and Red gradient nail design is also on top of our list. The design involves using acrylic nails that have a unique use of black and the richness of maroon.
You should not that the maroon colour will take up most of the surface on your nail. You can also complement this look with a clear base coat, and use your original nails as well. Remember to put your nails under an LED light to help complement the richness of these two colours.
| Application Time | Products Needed | Challenges |
| 50 to 100 minutes. | Short tipped acrylics, nail glue and nail disinfectant. | Applying the clear coat. |
4. Blueberry Gradient
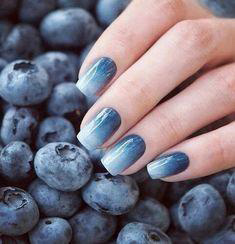
If you are a fan of the halo game or just like the traditional goth look, consider trying out this unique blueberry gradient design. The nail design is unique because you can use it on both acrylics and your original nails.
You will start by applying the blueberry color on the lower edge of your nails. However, apply a light grey finish at the tip of your nails, to produce the “fade out” effect. Or, you can go for acrylics that have the ready made nail design.
| Application Time | Products Needed | Challenges |
| 30-50 minutes | Short tipped acrylics, nail glue, nail disinfectant and a clear coat. | N/A |
5. Pink to Holographic
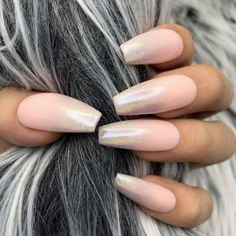
Pink is a natural color for colours, and what a better way to get the most of pink than with this appealing holographic look. The look involves applying a light pink paint on the edge section of your cuticles. However, the look also needs long acrylic nails to bring out the original appeal of your nails.
However, the tip of the nails will get a light grey finish, and apply it gently so as to achieve the best results. If you have long hair, you can complement this look with some black and light grey hair.
| Application Time | Products Needed | Challenges |
| 45 minutes | Long tipped acrylics, nail glue, a clear coat and nail disinfectant. | Setting the long tipped acrylics. |
6. Nude to Orange
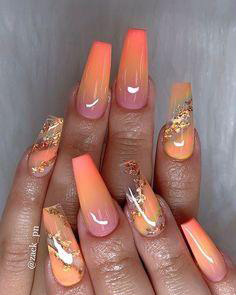
If you have lots of time to spare on your schedule, you can also try out this bold and nude orange design. While the major highlight for this look would be orange, you can also complement it with some purpose and golden coats.
The nails on your middle and ring finger will get the orange purple gradient. However, the pinky and index finger will get a transparent acrylic. You can complement the acrylics with some golden and orange colours.
| Application Time | Products Needed | Challenges |
| 40 – 60 minutes. | Long tipped acrylics, golden glitter polish, orange nail polish, nail glue and a clear coat. | Applying the different shades of nail colour. |
7. Pink to Black
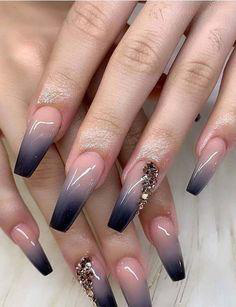
Portraying a unique sense of masculinity and femininity at the same time, this pink to black nail design is also exceptional. It involves using a majority of black paint, balanced with a light pink gradient finish all the way through to your cuticles.
The look needs a set of long acrylics to help accentuate the boldness of these two famous colours. However, complement your ring finger nails with some jewelry, which you can set using some glue.
Furthermore, you also have to apply a base coat to your nails, and let it sit under an LED light for improved results.
| Application Time | Products Needed | Challenges |
| 10-30 minutes | Long tipped acrylics, coloured rhinestones, nail glue, and green nail polish. |

- Crochet Braid Hair Cost: Hope for a Style to Slay!! - January 9, 2024
- Best Braid Pattern For Crochet: Hair-Styling Tips And Tricks - January 3, 2024
- How To Braid Hair For Crochet: Best Hair-Styling Tips! - December 26, 2023