Do you love nail art and have trouble seeking out excellent short nail designs? While many people love long nails, short nails can also be appealing when you do them right. So, remember that nail art is not only for our long clawed sisters.
In some cases, having long nails is not reasonable, especially if you have a delicate career. Sometimes, long nails are not just your thing. However, this does not mean that you can get creative with your nail designs.
You can alternate between short nail designs, color selection, placement and various other factors. Furthermore, resources such as nail stamps, glitter and 3-D nail accents can be a great way to boost the appeal of your short nails.
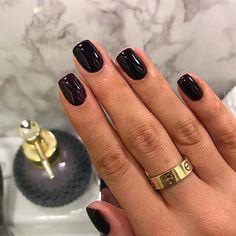
1.Black Gel Short Nails
Application Time – 30 – 50 minutes.
Ingredients – Black nail polish, clear coat, jewellery and an LED light.
The Steps –
A TOP pick indeed. Starting out our list of nail art designs would be these black gel short nails, which look simply stunning.
To pull this look off, you will need a black nail polish coat. Apply it on your nails, and then complement it with a clear paint coat. Then, let it cure under an LED light for the best results. Plus, since this design involved a plain nail polish coat, consider complementing this design with some jewelry.
2. Gold Sequins Short Nails
Application Time – 40 – 50 minutes.
Ingredients – Pink nail polish, golden glitter, short, nail glue and straight tipped acrylics.
The Steps
For this Gold Sequins design, consider using straight tipped acrylic nails. First start by cleaning your nails, and then set the acrylics on top of all your nails. The acrylics should have a light pink colour for this look, and apply them to each finger except the pinky finger.
For the middle and ring finger, apply a shade of glitter on top of your nails. For the pinky finger, apply some glitter on the entire nails to help bring a sense of balance to this look.
3. Orange Short Nails
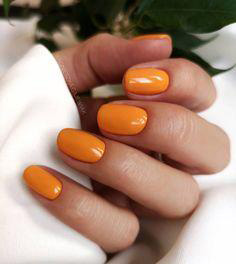
Application Time – 50 minutes to 2 hours.
Ingredients – light orange nail polish, a clear coat, nail glue, and short tipped acrylics.
The Steps
Orange looks simply stunning on nails, especially when applied the right way. For this nail art design involving short nails, you will need a light orange paint coat. Start by applying the light orange nail coat on all your nails.
Then, apply a clear nail polish coat over your nails, and let it sit under an LED light.
4. Colorful Spot Short Nails
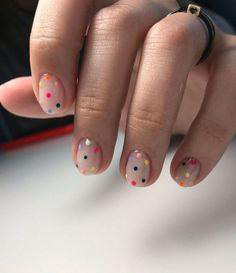
Application Time – below 30 minutes.
Ingredients – Yellow, pink, blue, green/red nail polish and a clear coat.
The Steps
There is a unique sense of appeal associated with simple nails, when done right! This look is ideal for those who want a simplistic appeal, but still look stunning at the same time. The first step is to apply the multi-colored spots of nail paint on your nails.
There is no specific rule for setting the colours, and you are free to get creative with things. Finally, complement your nail design with a clear nail polish coat for the best results
5. Blue Gel Short Nails
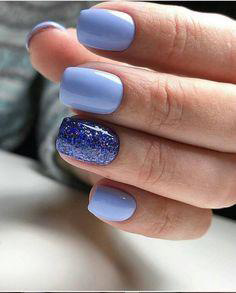
Application Time – 1 hour 30 minutes.
Ingredients – Light blue nail polish, light blue glitter and a clear coat.
The Steps
You can also take things a step further with this stunning blue gel short nails design. For this nail pattern, you will need short tipped gel nails to ensure the best results. Start by applying a light blue coat on all your nails, except the ring finger.
For the ring finger, apply a light blue glitter nail coat. Then let your nails sit under an LED light for the best curing quality. Also, since this look is delicate, let your nails sit in a place free from dust or lots of moisture.
6. Glitter Powder Short Nails
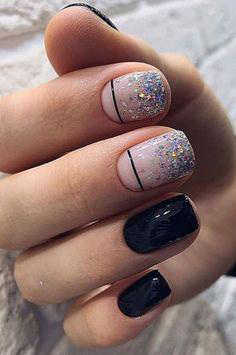
Application Time – 2 hours.
Ingredients – Black nail polish, a clear coat, blue/yellow glitter, and a line stencil.
The Steps
You will feel good when your nails look good! Make a good impression on your mates with this glitter powder short nails design. This look involves the use of gel nails, along with some glitter to ensure the best results.
Start by applying the gel nails to your ring, pinky and thumb fingers. However things get unique on your middle and index finger. For these fingers, set a unique black line coat just above the cuticle.
Then, apply some glitter on the top tips of your nails, and let your nails sit in a cool and dry place.
7. Line Short Nails
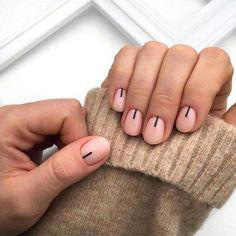
Application Time – below 30 minutes.
Ingredients – black nail polish, stencils, and a clear coat.
The Steps
Again, there is a significant level of simplicity associated with line short nails. For this design, you will need a single coat of black nail paint. Furthermore, you will also need a unique line stencil, which you shall use to produce a unique finish on your nails.
Once you set the line stencils on your nails, apply the black coat of paint on your nails. Let it sit and dry for a few minutes. Then, finally complement the finish on your nails with a clear coat of your nail polish to ensure the best results.
8. Nude Gel Short Nails
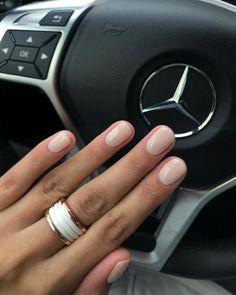
Application Time – below 30 minutes.
Ingredients – Gel nail polish, an LED light and a clear coat.
The Steps
You are one step away from looking good, yet simple enough to hit the office. For this look, you will need light pink gel nails. Start by cleaning your nails with some disinfectant. Then, set the gel product over your nails.
Next, apply a clear coat of nail polish on top of all your nails, and let them sit under an LED light for curing purposes.
9. Holographic Short Nails
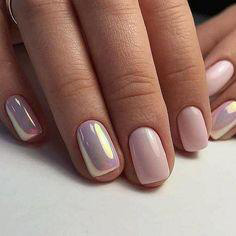
Application Time – 60 minutes average.
Ingredients – Light grey polish, a clear coat, and LED light.
The Steps
There is something unique about this holographic nail design, and it’s easy to pull off this look. You will start by applying a silver nail polish coat over your pinky and ring fingers. Then, apply a light purple nail coat over your middle, pinky and thumb fingers.
Finally, complement this nail polish design by applying a clear coat of nail polish. Finally, let your nails sit under an LED light for the best curing result.

- Crochet Braid Hair Cost: Hope for a Style to Slay!! - January 9, 2024
- Best Braid Pattern For Crochet: Hair-Styling Tips And Tricks - January 3, 2024
- How To Braid Hair For Crochet: Best Hair-Styling Tips! - December 26, 2023