Ghosts sometimes make up for interesting topics. And If you ever watched any show featuring ghosts, you will know that they are some of the most intriguing things in history. Did you know that you can get this type of intrigue in people – by pulling off the ghost nail art design?
We have this all-inclusive guide that contains several ghost nail designs you can try out. Furthermore, the designs in our list vary, and you have the freedom to play around with your creativity.
Ready to get started, let us start things off
Ghost Nail Art Design-1
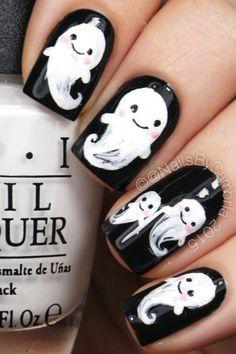
Average application Time – 2 hours.
Items Required – black nail polish, ghost stencils, white paint, and a clear nail coat.
The Steps
While many people associate ghosts with mysterious things, you can make things better with this ghost nail art design. It’s a unique nail polish design, which involves straight tipped acrylic nails.
Start by applying the paint to all your nails. Then, let it sit under an LED light, and then complement the final finish with a white stencil. You also have the option of finishing this look with a clear coat of nail polish.
Ghost Nail Art Design-2
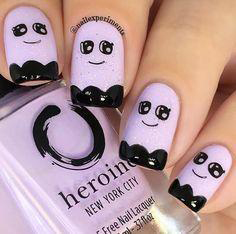
Average application Time – 60 minutes.
Items Required – white nail polish, ghost stencil, black nail polish, and a clear nail coat.
The Steps
Stand out from the crowd with this Ghost Nail design, which looks stunning and attracts attention at the time. First, this nail design involves the use of a light white coat of paint, which you apply over all your nails.
Next, you have to place a unique face stencil on your nails, and ensure that it also sits on the tip. Then, apply black nail polish to the structure of your nail. Finish this look with some clear nail polish for the best results.
Ghost Nail Art Design-3
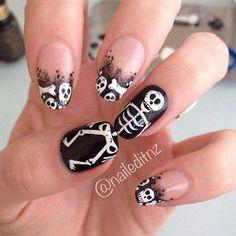
Average application Time – 50 minutes.
Items Required – Skull and bones stencils, black nail polish, white nail polish, short tipped acrylics, and a clear coat.
The Steps
The next contender on this list would be this Ghost Nail Art Design, which involves the unique use of skull and bones. You will need some black nail polish, white nail polish, and skull/skeleton stencils.
For this nail design, start by setting the unique skull and bone stencils on your pinky, ring, and index fingers. Set them around the tip area, and leave out the cuticle section.
However, for the thumb and middle fingers, you will need a stencil with some white nail polish. The thumb and middle finger will get a black coat of paint. Apply the white nail polish over the stencil, such that it produces the skeleton design.
Ghost Nail Art Design-4
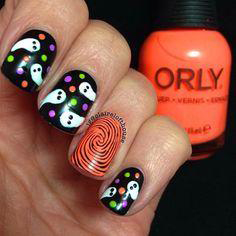
Average time required – 90minutes.
Items needed – short tipped gel nails, ghost stencils, multi-colored nail colors, and hypnotic nail pattern.
The Steps
Take things to a whole new level with this gel nail design, which involves the use of different colored stencils. The first step for this is to apply black gel to all your nails. Then proceed to apply unique ghost patterns to all your nails.
You will then have to complement the nail design with some multicolored patterns to give your nails a unique appeal. However, for the ring finger, you will apply a unique black and orange spiral nail design.
Ghost Nail Art Design-5
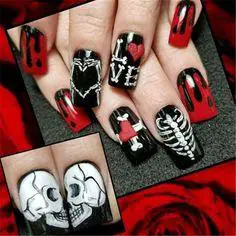
Average application Time – 30 minutes.
Items Required – cross pattern stencil, love stencil, black nail polish, and maroon nail polish.
The Steps
Next on this list would be this ghost nail art design that involves the use of long and straight-tipped acrylic nails. For this nail design, you will need different nail colour patterns and stencils. The first one would be the unique “blood-stained design” which you shall apply on your index fingers.
The other stencils you will need for this look include the scorpion, love, and cross-shaped stencils. Remember to let your nails sit undisturbed for a few minutes to ensure the curing goes well
Ghost Nail Art Design-6
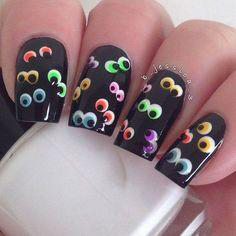
Average application Time – 45 minutes.
Items Required – short tipped acrylics, black nail polish, ghost eye stencils, and a clear coat.
The Steps
Take a look at this unique ghost-themed design, that involves simple multi-colored stencils. Start by cleaning your nails, and then set the long tipped and straight acrylics on your nails. The long-tipped acrylics are excellent as they help accentuate the unique appearance of the ghost eyes.
Then, set the multicolored eye patterns on all your nails. You can apply these patterns in a random fashion, and remember to let your nails sit undisturbed for natural curing purposes.
Ghost Nail Art Design-7
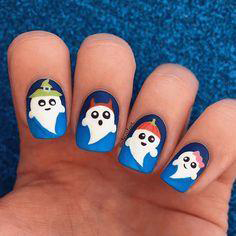
Average application Time – 55 minutes.
Items Required – light blue nail polish, white ghost stencils, dark blue nail polish and short tipped acrylics.
The Steps
When you have free time on your hands, remember to try out this unique ghost nail art design. Even if it looks somewhat complex, you can pull it off with a simple stencil and a few unique colors.
Start the application process by applying the gel to all your nails. Then, set a navy blue base coat on all your nails. For the tip of your nails, set the light blue coat over them. Then, set the ghost stencils on your nails, and apply a white coat over each stencil.
However, give them a bit of a twist by applying tips with varying colors on the top structures of the ghosts. Let them sit and cure naturally for a few minutes.
- Crochet Braid Hair Cost: Hope for a Style to Slay!! - January 9, 2024
- Best Braid Pattern For Crochet: Hair-Styling Tips And Tricks - January 3, 2024
- How To Braid Hair For Crochet: Best Hair-Styling Tips! - December 26, 2023

